Custom Built Garden Rooms, Cabins and Timber Buildings
  • Home
  • About Me
  • Gallery
  • Cabin KITS
    • Kit-Quote
  • Bespoke Cabins
    • Triangular Cabin - Guildford
    • Garden Annex
    • Garden Office
    • Pool House
    • Log Cabins
    • Garden Gym
    • Garden Studios
    • Bluebell Cottage - Little Bookham
    • Garden Summerhouses
    • Garden Room
    • Mini Cabins
    • Tree House
    • Cabin Extras and Upgrades
  • Standard sizes
  • Bespoke Garden Sheds
    • Chicken Coop - Cluckingham Palace
    • Shed Spec
    • Claygate-Potting Shed
    • Garden Sheds
    • Timber Garages
    • Garage Makeover
    • Cycle/Bike shed
    • Workshops
    • Boat House
    • Oak Carports
    • Front Door Porch
  • Contact
  • Price Guide
  • Extras
  • Blog
  • Insurance
  • Linear Metre Calculator
  • Flintstone Kitchen

Linear Meter Calculator

2/7/2022

 
PictureLinear Metre Calculator - App
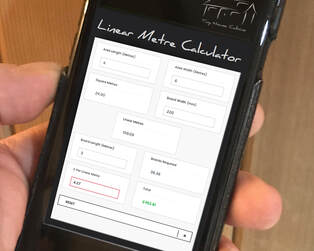
To some it comes naturally when working out how many linear metres of timber is required for particular project. To others, it’s not so easy. Just getting your head round a relatively easy calculation can become very confusing. 

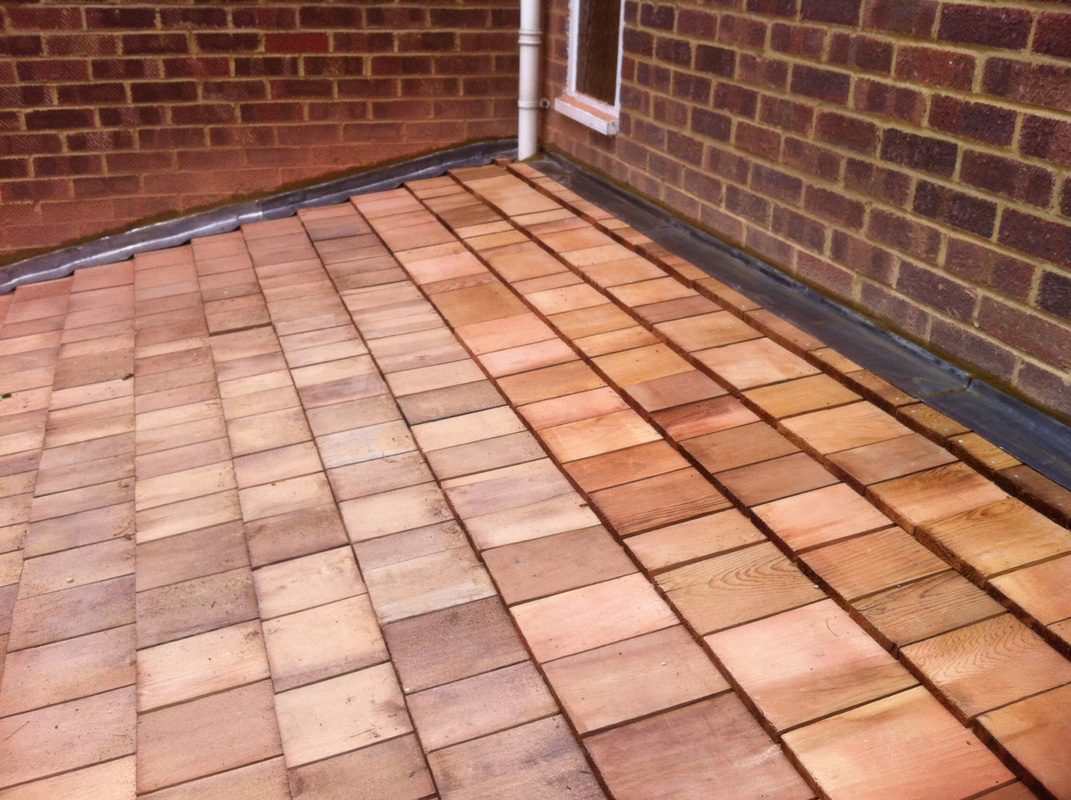
Simply put, if you had a 1 metre x 1 metre area the square metre area would be 1 square metre. To work out the linear meters in a 1 square metre area would depend on how wide the boards are cut. Assuming the boards needed were 100mm wide, you divide 1000mm by 100mm, which will be 10. So…. At 100mm wide boards in a 1 square meter area you will have 10 linear metres. Pretty easy really, yeah? 
​


It gets a bit more complicated when you start to use larger areas, different widths, longer lengths and multiplying the total by a given price. For example: The area is 4 metres x 6 metres and you intend using 22cm wide boards at 3 m lengths.

​Before you start to work it all out or you are not mathematically minded, there is an easier way to get the answer you need by using the Linear Meter Calculator. It will even tell you how many boards you would need and more importantly, if you know the price per linear meter… how much it will all cost? Don’t forget to add 10 or 20% for wastage depending how far apart your fixings are going to be. 

Improve the value of your home.

11/13/2018

 
According to an article back in March by Country Living, building a Garden Room is the second quickest way to improve the value of your property based on expert’s knowledge in the Surrey area. The increase is estimated at £35,600 for a project that would typically take around 14 days said Brian Berry, chief executive of the FMB (Federation of Master Builders). This obviously depends on the size and quality of the building itself but it goes without saying the more you invest, the more return you are likely to see.

To test this theory, I searched for similar properties in the same road that I found offered for sale on Zoopla. Zoopla’s search facility has a neat little option to include key words in your search (such as Cabin) to narrow down your search. By using this tool you can compare properties and prices with and without a Garden Cabin. The results were staggering.

A few years ago I built a 3m x 4m cabin at the end of a garden in Surrey.  It had a lofted sleeping area for a double mattress, a small shower room, WC and under floor heating which cost the owners £18,000.

The property was recently sold for £521,000. A few doors away is an identical property that I found on Zoopla in roughly the same condition but without extra living space at the end of the garden being offered for sale at £479,950 (that's £41,000 less).

Picture

AIR BNB

9/6/2018

 
Picture
Since the announcement of the infamous Brexit, I have noticed a large amount of enquiries with customers wanting a cabin to rent out via Air BnB, Booking.com and other holiday style websites. Obviously residents of the UK are looking for more affordable options to a weekend break or a summer holiday where Air BnB thrives. Is the trend due to new changes in holiday style, being able to make a bit of extra cash or just for the pure love of spending time in the UK? Who knows but I have seen a significant increase in Air BnB style requests.

By way of a testimonial, the attached photo is a cabin we built in Westerham which was purchased for the sole intentions of renting out to couples, families and tradesman working in the area for up to a couple of months. We finished this build in August 2017 and according to the owners, it has been rented out pretty much every week since we finished.

Needless to say, quite a lot of the interest has come from online holiday sites but a good percentage from potential customers of mine wanting to see one of our builds in person. We don't have a showroom or show site but directing customers to past clients is pretty handy for me and our customers.
If you are considering purchasing a stylish cabin with the view to renting it out for weekend stays and short holiday lets, you might want to consider the support we can give via passing traffic to our websites.
As you can probably tell, we do attract a fare amount of attention from the media such as National Newspapers, TV shows and Magazines, buying one of our cabins could give you a kick start for your rental idea.
By the way, if you are interested in staying in the cabin pictured, a link to the owners website is on the link below :-)
The Secret Cottage


Laying a concrete base

12/2/2017

 
Vertical Divider
Concrete base set-outConcrete base set-out
The secret to laying a perfectly flat concrete base is in the prep work. Don’t be tempted to save a couple of pounds on materials thinking the base will turn out how we want it.
 
Firstly, the area doesn’t necessarily need to be dug out first and hard-core laid as long as the ground is nice and firm.  Using re-bar in the concrete will give the base the strength needed.
 
Map out the area of the cabin size. i.e.: a 6m x 4m cabin needs a base of 6 meters by 4 meters exactly believe it or not. Please don’t add a few inches for good measure., we want the cladding to overlap the base so the rain can’t get under the cabin.

Picture
Using 6”x2” timber (150mm x 47mm), Make the up stands in a rectangle so the inside measurements are the same as the cabin size (the concrete area). Cut pegs using 2”x2” timber (47mm x 47mm) with a point at one end. For best results, dig holes for the pegs and concrete them in at least 15 inches down. You can cut the pegs out below ground after and remove them. Be sure to use 6” x 2” timber for the up stands. PLY WILL NOT DO, it will bend under the weight of the wet concrete and the base will have a dip in it. Also, be sure to use pegs of at least 2”x2”, BATTEN WILL NOT DO.
The corner-to-corner measurement is very important to make sure the base is square. Measure diagonally corner-to-corner and be sure they are equal (give or take 5 mm). ie: a 4m x 6m base should measure approx 7210mm corner to corner in both directions.
Make sure the up stands are level using a long spirit level or a laser level if possible.

Vertical Divider
For the best finish and an easier job, I tend to order concrete from a ready mix company and hire a pump also. For the extra £300, it is worth it. They can pump up to 150 feet but check with the company first. Ask for the mix to be quite wet, once it is poured it is easier to level and the result is far better, a bit like a frozen lake.

While the concrete is being pumped, place lengths of re-bar in the concrete about 2” in from the up stands and over lapping in the corners. Ideally place 2 layers of re-bar all the way round the outside of the base. One about 2” off the ground and the second at about 4” off the ground directly over the first.  That forms the strength in the base.
For soft ground, its best to use Reinforcing Mesh sheets and cover the whole area.
Re-Bar
Lengths of Re-Bar
Reinforcing Mesh sheets
Important
Be sure to wear waterproof boots and gloves, CEMENT BURNS.
Tamping wet concrete base
Wet concrete base
Wet concrete base

How long will our cabins last. (Life Span)

11/28/2017

 
Good question!

I have not been around long enough to test them myself. However, we build them pretty much the same as a loft conversion on a house. Same grade timbers, insulation, weather proof membrane etc. After building loft conversions for over 10 years, I would expect them to last pretty much the same length of time. If you use a Victorian house as a comparison, modern materials are much better than they used 100 years ago and those houses have lasted well enough although probably on their last legs over 100 years later.
Vertical Divider
Picture

Vertical Divider
Picture
The two things that will need maintenance or eventually replacing is the roof tiles then the cladding. Under those two materials is a weather proof membrane which protects the main structure so in affect the structure has not been exposed to any weather at all.

The manufacturers guarantee the cedar tiles for 20 years. Cedar tiles are widely used on roofs in Canada that get exposed to pretty harsh weather. In the UK, I would think the roof tiles would last at least 30 years before needing attention.
The 8" cladding is all pressure treated as standard and is widely used on barns (Barn Boards). I have seen 100 year old barns with cladding that needs replacing and bearing in mind those boards would not have been pressure treated 100 years ago. The same membrane is behind the boards that protect the main structure.
The base would have a thick DPM. Damp proof membrane. The same material which is used on extension floors on modern building methods today. All in all, I would think the cabins would think the life span would be a minimum of 50 years if not more.
Picture

Bespoke cabin furniture and storage

2/25/2015

 
If you are going to invest in one of our fantastic garden cabins, you may want to consider the inside too. All our cabins are custom built and that includes storage, furniture and nick-nacks such as A Table Tennis Bat holder, a rustic looking Snooker Score Board and funky looking Coat Hooks. The character and look of the inside space is a very important factor which adds to the overall design of the build.
This cabin is now available in kit form and would make an ideal holiday home, garden annex or games room.

Do Garden Buildings or Log Cabins need Level Ground? 

1/4/2015

 
The short answer is Yes and No!
Most Garden Building and Log Cabin kit companies specify in their terms of contract that the structure must be built on a level base. They mean "perfectly level" or your garden cabin may not sit flat and in some cases making it impossible for the cabin to fit together properly. Even a slight dip or slope in the base will invalidate your guarantee which means if your cabin
doesn't sit flat, the doors don't sit square and the windows may be slightly twisted... this is now your problem, not the manufacturers!


Whats the best method to level a base?

Log Cabin Level baseLog Cabin Level base methods
Firstly, your base can be built on uneven ground or even on a slope. The base is designed to do 2 things, give the cabin a firm base to sit on and provide a true level for the structure.
There are a number of methods to make sure a level base is achieved, some more accurate than others. One of the most popular methods id with a spirit level. All very well and good but unless the spirit level is the length of the cabin you will have to slide it across the whole base to check the level. You only need to be very slightly off level and by the time you get to the other end of the base 6 meters away, you could be more out of level than you thought.

A better way to measure the height for the base is with a laser grid level. They can be a bit costly for a good one and still has one major problem. If you choose to build the base in the day time (which I'm sure you would), you may not be able to see the laser in the daylight!

A cheap, simple and very accurate method would be to use a garden hose! Use a garden hose that still has water in it to save a bit of time. Strap/tape one end of the hose to your corner marker which can be a stake or a piece of batten hammered into the ground so the top is exactly the height of your base. At the opposite corner, hammer in another stake a little way. Place the other end of the hose so the top is level with the top of the stake and look for the water level. You may have to top up the hose with a watering can to make sure you don't have air bubbles. Both stakes will be at the same height when the water is flush with the top of the hose, just before it drips over the edge. A slow process but gravity doesn't lie!

Note: Two important factors in the success of this method, 1/ make sure the rest of the hose is flat on the ground and doesn't bend up higher than the stakes even if you have to lay a bit of timber on top of it to hold it down. 2/ It may be an
obvious one but anyway, if it's very cold outside, make sure the hose hasn't got ice in it! :-)


How to build a concrete base

Check out previous post: Garden Building Concrete Base

building in the garden

12/12/2014

 
Picture
Have you been considering building in the garden? A garden summerhouse, an office in the garden, the garden room or a garden house? Trends show that Garden building center sales in the UK are up year on year as the garden building option takes hold. The garden room, garden home office and summer houses market is flooded with plenty of designs and styles to choose from but choice is sometimes the hard part.  Do I choose this one or that one, I like this garden room but I like that one as well. What if you could combine some parts of the garden room you like with other parts from the garden building you also like. This is why we are a great option for building whatever you are thinking of building at the bottom of the garden. All our designs are one offs, bespoke designs built with your favorite styles and features in mind. Our team takes your ideas and needs as a platform to create the ideal timber structure in the garden which you will adore and become the focal point of your garden you can be proud of.


Small Home Workshop

9/10/2014

 
Timber WorkshopSmall timber workshop
More and more people are working from home and need a bit of personal space to tinker with models, fix things, make clay pots etc. In a lot of cases people are having to use the good old garden shed which is shared with the lawn mower, a few kids bikes and old tins of paint (which we never use to re paint the lounge).
Having a bit of space to your self is such an important factor for lots of these projects and hobbies which is easily achievable with a bit of planning and a spare corner of the garden. It doesn't have to be big but it does have to be water tight, insulated and have power and light for the winter months and evenings.
Security is always an area that comes top of the list of priorities when planning a home workshop build. With strong doors, 5 bar locks and hinges that are designed for out door use.
Once you have the basic shell built, the fun is turning your home workshop into your new man cave and customize it to house all the bits and bobs you need. A home workshop can be as small or as large as you like but the general build "Must have" list is always the same, Security and Comfort. All the workshops built by us are bespoke, depending on what you need and want to use it for depends on how it is built but always have those two main factors in mind.

strong timber workshop
Secure timber workshop
cedar roof on workshop
Cedar workshop roof

Garden Building Concrete Base

8/14/2014

2 Comments

 
Building a strong shed/cabin baseBuilding a strong shed/cabin base
For your Garden Room / shed to be strong and stable, you will need to make sure you are building on a hard/Solid base.  First of all, the site must be cleared of bushes, plants and general rubbish. In most cases, we are replacing an old shed or garden building that has reached the end if its useful life and a base may already be in place. Just because it already has a concrete base doesn't mean the base is OK.
Is the old base thick enough, does it look damp and is it even? Most of the time, the reason why an old shed/garden building has to be ripped down and replaced is because the base was not doing the job it should be.

To be on the safe side, we always replace the base anyway. Chances are, our cabins are a lot heavier per square foot than the one that has been removed.

There are a few options when it comes to laying a solid base for the new cabin. A solid slab of concrete, Piles / Piers, or the type of base I build which is a re enforced concrete/steel grid. The guys call it a "Burton Base"! Bare in mind the amount of weight the cabin is going to be, my cabins are about half a ton per sq mt but most of that is on the outer edges.

Types of Garden Building Bases
  • Slab: Most of that dead weight is being forced on the outside edges of the base. With a solid concrete slab base, the strongest part is the middle and the edges are the weakest, exactly where you want all the strength. The middle is just taking the weight of the flooring and foot traffic so does not need to be that strong, just strong enough.

  • Piles: Digging holes and concreting posts in the ground is all very well and good as long as the are all at exactly the same height and all have a hard sandy base to each hole. Some areas of the garden may be a bit softer than others and the chances of a few of the post sinking an inch or two is quite likely. The same with placing bricks and concrete blocks on the ground, they will sink a bit over a short space of time, more so if the ground is quite soft from years of fallen leaves etc. Its just not worth it, spend a bit more time, use a bit more effort and build a base that is strong and will last.

How to build a Garden Building BaseHow to build a Garden Building Base
  • Burton Base: For the above reasons, I designed a grid system as my bases have to be very strong and not crack. Even solid slabs can crack in time as one side sinks a bit. You can see the results of that in most car garages. My bases are a bit like a giant towel rail with re enforced steel rods in to stop them cracking. They also have a damp course to stop moisture getting to the timbers and starting to rot the base. This type of base will be much better in the long run for small to medium  cabins/ sheds and your garden building will have a much longer life span.

How to build a "Burton Base"

Measure the width and length of the cabin and peg it out on the ground.
Set out pegs in each corner, making sure the corner to corner
measurement is exactly the same.
This will ensure the corners are all at 90 decrees as long as the widths and lengths each end are equal.
  • Top Tip: Another way to do this is to use the 3,4,5 method. Measure from one corner across the width to "3" (feet or meters). From the same corner measure along the length to "4" (feet or meters, which ever you chose to do the width). From the "3" measurement to the "4" measurement will be exactly "5" if the corner is a 90 degree corner which as we all know from our school days is a "Isosceles right angled triangle". If not, move the pegs a bit until you have 3 exact measurements (3,4,5)

Re enforced log cabin base.Re enforced log cabin base.
Start mixing concrete to an 8-1 mix (or 8 shovels ballast to half a bag of cement) and not too wet. Lay a layer of concrete all the way round the grid about an inch thick, the place the re-bars in the middle of the trenches. Be sure to over lap or cross over and re-bars that join not just butt them up together (Very important). the overlapping bars makes it all one grid rather than the butted ends cracking on the joins over time or as weight is added to the structure. Once the first layer of re-bar is in, add another layer of concrete about 2 inches thick and do the same again with the re-bar. You don't want the two re-bars too close together, keep them at least 2 inches apart (one close to the bottom of the trench and the other close to the top). The cross over trenches only need one re-bar as it is only taking the weight of the floor, furniture and foot traffic, unless the customer is thinking of having a snooker table or something that needs a very strong base. Fill the rest of the trenches up to the top so they are flush with the tops of the boards. Don't forget to wash out the mixer, all the tools and wheel barrows!
The base should be ready to start building on the next day but if you can leave it for a couple of days that is even better.
Once it is all set, remove the inner boards to re use. You may as well leave the outer ones in place as you will need them to cover the concrete anyway. Cut the DPM back to the tops of the boards and you now have an ultra strong base with a damp proof course built in.

Garden Building concrete baseGarden Building concrete base
Dig a trench around the outside at approx 6 inches deep. (if the ground is very hard, 4 inches should be OK but if the ground is extremely soft, go about 10 inches down. Edge the sides with timber (4x1, 6x1 or scaffold boards). Make sure the base is compact and flat, you don't want a curved base, a nice squared off base is ideal to stop any sinking. Then dig trenches across the width in the same way and at the same depth even though it does not need to be as strong as the outside edge. The cross trenches should run into the edge trenches so either cut the inside board where needed or do the inside edge boards last. You want it to all be one connecting trench so all the concrete becomes a single large grid (like a heated towel rail) and not an outer grid with cross beams that don't connect all together as one.
Line the trenches with DPM (Damp Proof Membrane) or a heavy duty plastic. Make sure you overlap any joins by at least 6 inches and the DPM hangs over the boards by at least 6 inches each side. This does 2 things, creates a damp proof membrane to stop the concrete sucking up moisture from the ground and stops concrete getting on the boards so you can re use them when building the cabin as corner posts, external skirting and soffits and fascias.
Before you start mixing concrete, make doubly sure the tops of all the boards are the same height. It is worth spending quite a bit of time on this because this will determine if your cabin is going to sit flat or not. make sure the boards don't sag in the middle and don't bow out. (don't rush it).


2 Comments
<<Previous

    Author

    Award Winning Designer/Builder of Tiny Houses and Timber Cabins.
    Follow me on:

    Picture

    Archives

    February 2022
    November 2018
    September 2018
    December 2017
    November 2017
    February 2015
    January 2015
    December 2014
    September 2014
    August 2014
    July 2014
    May 2014
    December 2011
    September 2011
    August 2011
    February 2011
    October 2010
    September 2010

    Categories

    All
    Bespoke
    Building
    Cabin
    Concrete Base
    Dog
    Garage
    Garden
    Garden Room
    Groundwork
    Kennel
    Pool House

    RSS Feed

Mark BurtonMark Burton
Workshop (Not a showroom)
Tiny House Cabins
Horse Ghylls Farm,
Capel Road, Horsham,
West Sussex,
RH12 4PZ.
Tel: 01306 302 306


Email
PLEASE NOTE: Our email address has changed. 13/09/22
Award Winning Designer/Builder of Tiny Houses & Bespoke Timber Cabins.
All material and content Copyright © 2019 Mark Burton. All rights reserved.
Registered with the UK Copyright Service.
Designs Registration No-284655164
  

All prices are subject to VAT at 20%.
VAT number: 263 5042 22

Tiny House Cabins Logo
Tiny House Logo
Tiny House ® registered Trade Mark

Surrey and parts of Berkshire, Hampshire, Buckinghamshire, Middlesex, East and West Sussex, Oxfordshire and West London.