 Building a strong shed/cabin base
 For your Garden Room / shed to be strong and stable, you will need to make sure you are building on a hard/Solid base. First of all, the site must be cleared of bushes, plants and general rubbish. In most cases, we are replacing an old shed or garden building that has reached the end if its useful life and a base may already be in place. Just because it already has a concrete base doesn't mean the base is OK.
Is the old base thick enough, does it look damp and is it even? Most of the time, the reason why an old shed/garden building has to be ripped down and replaced is because the base was not doing the job it should be.
To be on the safe side, we always replace the base anyway. Chances are, our cabins are a lot heavier per square foot than the one that has been removed.
There are a few options when it comes to laying a solid base for the new cabin. A solid slab of concrete, Piles / Piers, or the type of base I build which is a re enforced concrete/steel grid. The guys call it a "Burton Base"! Bare in mind the amount of weight the cabin is going to be, my cabins are about half a ton per sq mt but most of that is on the outer edges.
Types of Garden Building Bases
- Slab: Most of that dead weight is being forced on the outside edges of the base. With a solid concrete slab base, the strongest part is the middle and the edges are the weakest, exactly where you want all the strength. The middle is just taking the weight of the flooring and foot traffic so does not need to be that strong, just strong enough.
- Piles: Digging holes and concreting posts in the ground is all very well and good as long as the are all at exactly the same height and all have a hard sandy base to each hole. Some areas of the garden may be a bit softer than others and the chances of a few of the post sinking an inch or two is quite likely. The same with placing bricks and concrete blocks on the ground, they will sink a bit over a short space of time, more so if the ground is quite soft from years of fallen leaves etc. Its just not worth it, spend a bit more time, use a bit more effort and build a base that is strong and will last.
 How to build a Garden Building Base
 - Burton Base: For the above reasons, I designed a grid system as my bases have to be very strong and not crack. Even solid slabs can crack in time as one side sinks a bit. You can see the results of that in most car garages. My bases are a bit like a giant towel rail with re enforced steel rods in to stop them cracking. They also have a damp course to stop moisture getting to the timbers and starting to rot the base. This type of base will be much better in the long run for small to medium cabins/ sheds and your garden building will have a much longer life span.
How to build a "Burton Base"
Measure the width and length of the cabin and peg it out on the ground.
Set out pegs in each corner, making sure the corner to corner measurement is exactly the same.
This will ensure the corners are all at 90 decrees as long as the widths and lengths each end are equal.
- Top Tip: Another way to do this is to use the 3,4,5 method. Measure from one corner across the width to "3" (feet or meters). From the same corner measure along the length to "4" (feet or meters, which ever you chose to do the width). From the "3" measurement to the "4" measurement will be exactly "5" if the corner is a 90 degree corner which as we all know from our school days is a "Isosceles right angled triangle". If not, move the pegs a bit until you have 3 exact measurements (3,4,5)
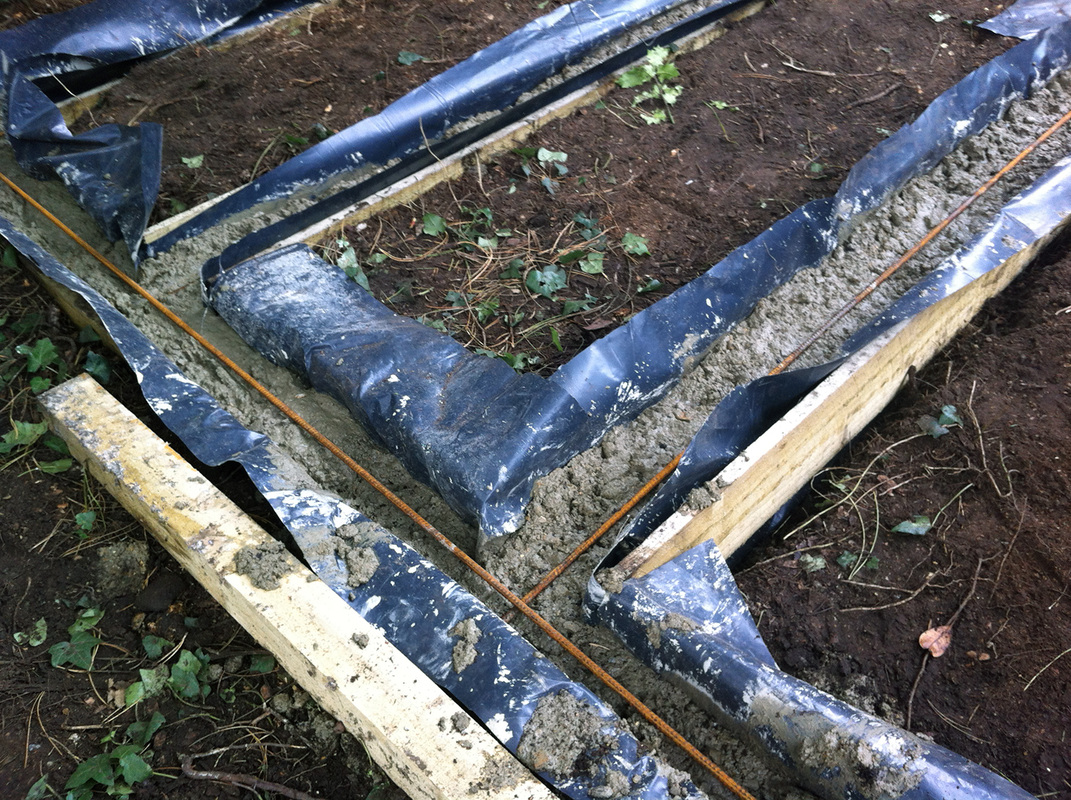 Re enforced log cabin base.
 Start mixing concrete to an 8-1 mix (or 8 shovels ballast to half a bag of cement) and not too wet. Lay a layer of concrete all the way round the grid about an inch thick, the place the re-bars in the middle of the trenches. Be sure to over lap or cross over and re-bars that join not just butt them up together (Very important). the overlapping bars makes it all one grid rather than the butted ends cracking on the joins over time or as weight is added to the structure. Once the first layer of re-bar is in, add another layer of concrete about 2 inches thick and do the same again with the re-bar. You don't want the two re-bars too close together, keep them at least 2 inches apart (one close to the bottom of the trench and the other close to the top). The cross over trenches only need one re-bar as it is only taking the weight of the floor, furniture and foot traffic, unless the customer is thinking of having a snooker table or something that needs a very strong base. Fill the rest of the trenches up to the top so they are flush with the tops of the boards. Don't forget to wash out the mixer, all the tools and wheel barrows!
The base should be ready to start building on the next day but if you can leave it for a couple of days that is even better.
Once it is all set, remove the inner boards to re use. You may as well leave the outer ones in place as you will need them to cover the concrete anyway. Cut the DPM back to the tops of the boards and you now have an ultra strong base with a damp proof course built in.
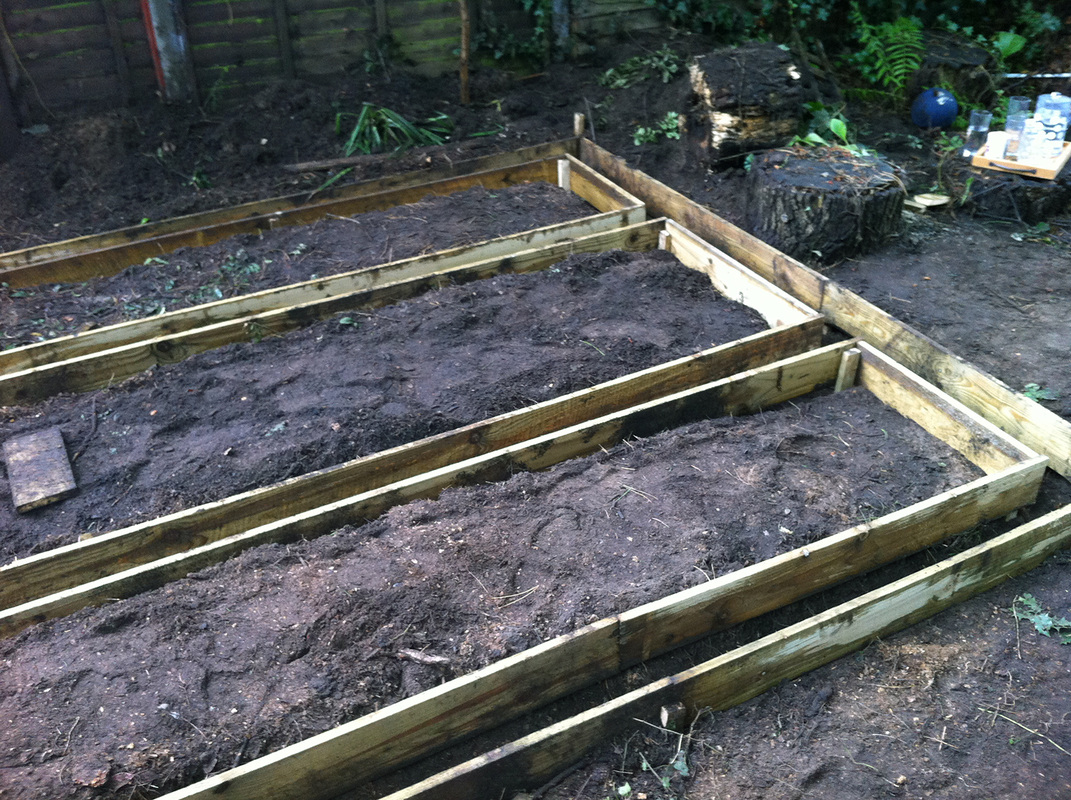 Garden Building concrete base
 Dig a trench around the outside at approx 6 inches deep. (if the ground is very hard, 4 inches should be OK but if the ground is extremely soft, go about 10 inches down. Edge the sides with timber (4x1, 6x1 or scaffold boards). Make sure the base is compact and flat, you don't want a curved base, a nice squared off base is ideal to stop any sinking. Then dig trenches across the width in the same way and at the same depth even though it does not need to be as strong as the outside edge. The cross trenches should run into the edge trenches so either cut the inside board where needed or do the inside edge boards last. You want it to all be one connecting trench so all the concrete becomes a single large grid (like a heated towel rail) and not an outer grid with cross beams that don't connect all together as one.
Line the trenches with DPM (Damp Proof Membrane) or a heavy duty plastic. Make sure you overlap any joins by at least 6 inches and the DPM hangs over the boards by at least 6 inches each side. This does 2 things, creates a damp proof membrane to stop the concrete sucking up moisture from the ground and stops concrete getting on the boards so you can re use them when building the cabin as corner posts, external skirting and soffits and fascias.
Before you start mixing concrete, make doubly sure the tops of all the boards are the same height. It is worth spending quite a bit of time on this because this will determine if your cabin is going to sit flat or not. make sure the boards don't sag in the middle and don't bow out. (don't rush it).

 RSS Feed